Top 5 YouTube Channels

YouTube is a great resource to learn new development topics. It is one of my go to places if I want to learn a new topic or even to get into a specific area. However, there are a few channels that I make sure and check out if there are new videos.

Traversy Media

One of my favorite channels, Brad really has some great content. Mostly going over web technologies he definitely goes over the big three frameworks - React, Angular, and Vue. However, he also goes over some pure CSS, HTML, and JavaScript in some of his videos. He also has videos that go over career and personal development issues that I find very helpful.

Fireship.io

This channel used to be called Angular Fire and by the name you may guess what he covers - Angular and Firebase. However, he's branched out quite a bit into some other videos such as Flutter for mobile applications. He has some of the best RxJS videos that I've found very helpful.

Academind

Maximilian Schwarzmüller is one of my favorite instructors for web based technologies. He has courses in all of the current popular frameworks - Angular, React, and Vue. He also has courses in some other technologies which may be useful to learn, such as Flutter and React Native for mobile applications and AWS for serverless applications.

Corey Schafer

Corey's channel is probably the most popular in terms of Python content. He's got so many videos that whatever you need to do in Python he already has a video about it. Another great thing about this channel is that he also goes into other developer tools, such as bash and dot files which I just started watching, as well as git.

Data School

The Data School channel is the best if you want to learn data wrangling and data cleaning with pandas or machine learning with scikit-learn. You can tell he has a deep knowledge with both of these libraries.

Top 5 Machine Learning Books

Machine learning is a vast subject and there is a lot to learn. Luckily, there are several books out there that can help us along the way. Below I list what I believe are the top 5 machine learning books that are currently out there.

Book Review: Python Tricks

If you've been around Python for a while, then you're probably familiar with Dan Bader. He likes to help people up their Python game and share his knoweledge of the language. Because of that, he released his own book, Python Tricks.


The book has seven sections of Python goodness:

  • Clean Python Patterns
  • Effective Functions
  • Classes
  • Data Structures
  • Loops
  • Dictionaries
  • Productivity

Let's look at an example in each of the above items so you can have an idea of what is in the book. These examples are ones that I have learned from when reading the book. Code examples in this post are my own.

Clean Python - Assertions

The very first tip in this book goes over using assertions in Python. Assertions, if you aren't familiar, is a way to well, assert if a condition is true. More specifically, a condition in which you expect to be true. If you have an assertion and it turns out to false, it will throw an AssertionError.

2019-03-30 16_55_19-Clipboard.png

If an assertion is caught it's a good idea to see why. Doing so will allow you to catch bugs that you may not have been able to catch before which is why having assertions are helpful.

Effective Functions - *args and **kwargs

When starting out in Python you may come across a method like the below:

def main(*args, **kwargs):
    print(args)
    print(kwargs)

Seeing something like this for the first time and, like me, you'll wonder what in the world that means.

*args are extra positional arguments you can pass in. The * in front tells it to gather all of those into a tuple. So if we take the method definition from above we can print the *args.

main("hello", "world")
2019-03-30 17_36_06-Clipboard.png

The **kwargs parameter does the same thing, but instead of a tuple it will be a dictionary since the kw in front of the args stands for "key word".

2019-03-30 17_36_50-Clipboard.png

Classes - Named Tuples

Tuples in Python are essentially a collection that is immutable. That is, once it's definied it can't be changed. To easily spot a tuple, the values in it will be enclosed by parentheses.

t = (1, 2, 3, 4, "five")
t
2019-03-30 17_48_47-Clipboard.png

However, if we want to get access to get access to the first item of the tuple, there's no dot notation to give us access to it.

2019-03-30 17_50_58-Clipboard.png

Though, we can use slicing to access it.

t[0]
2019-03-30 17_57_26-Clipboard.png

With a NamedTuple we can create a tuple and access items in it with the dot notation.

from collections import namedtuple

t = namedtuple("t", ["one", "two", "three", "four", "five"])

items = t(1, 2, 3, 4, "five")
2019-03-30 17_59_51-Clipboard.png

Data Structures - Sets

Sets are a data structure that simply gives unique values. This can be quite useful if you want to remove duplicates from a list.

set([1, 2, 3, 4, 2, 5, 3])
2019-03-30 18_07_38-Clipboard.png

Loops - Comprehensions

List comprehensions are perhaps one of my favorite things in Python. It is essentially sytactic sugar on top of using a for loop and, once understood, can be easier to read since it is only in one line. For example, let's say we have the below loop:

item = []
for i in range(0, 10):
    item.append(i + 1)

print(item)
2019-03-30 18_43_38-Clipboard.png

We can rewrite it using a list comprehension:

[i + 1 for i in range(0, 10)]
2019-03-30 18_44_09-Clipboard.png

What if we need an if statement in the loop, like below?

item = []
for i in range(0, 10):
    if i % 2 == 0:
        item.append(i + 1)

print(item)
2019-03-30 18_44_39-Clipboard.png

That can also be broken down into a list comprehension.

[i + 1 for i in range(0, 10) if i % 2 == 0]
2019-03-30 18_45_05-Clipboard.png

Dictionaries - Default Values

Often, when checking if a value is in a dictionary, it's not always known if that value is in the dictionary in the first place. The get method on dictionaries is a good way to get the value if it is in the dictionary or to return a default value if it is not in the dictionary.

For example, let's say we have the below dictionary.

d = {"x": 1, "y": 2}

We can get the y value with the get method.

d.get("y")
2019-03-30 18_56_17-Clipboard.png

But if we try to get the value from z which doesn't exist in the dictionary, we can give a second parameter to the get method to return that value as default if the key doesn't exist.

d.get("z", 0)
2019-03-30 18_56_53-Clipboard.png

Also, if we don't specify the default value and the key doesn't exist in the dictionary, the get method won't return anything.

d.get("z")
2019-03-30 18_57_36-Clipboard.png

Productivity - dir

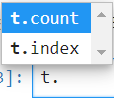
While Python is a great language it is also a bit weird to work with when trying to explore through code what methods or properties a variable can have. That's one of the nice things with C# and it being a typed language. I can use the dot notation and intellisense to see what is available on a variable. With Python, though, that may not always work even in great editors such as PyCharm and Jupyter.

This is where the dir method comes to the rescue. Using this method we can see exactly what method and properties are on a variable.

For example, let's say you wanted to see what all is avilable on a list object.

x = [1, 2]
dir(x)
2019-03-30 19_06_30-Clipboard.png

The dir method has saved me a lot of time trying to find what's available on objects instead of having to hunt down the documentation.


I consider myself a beginner to intermediate in Python. Some of the tricks in here I've seen before, such as asserts and list comprehensions, but most of the ones in this book I haven't. I definitely learned quite a bit more about using Python. Both for cleaner code and to utilize what the language has to offer whether than defaulting to what I already know from another language.

Whether you're just beginning or a pro in Python, there's something in this book to learn from. Maybe there'll be a second edition soon.

ML.NET End-to-End: Build Model from Database Data

When doing machine learning on your own data instead of data downloaded from the internet, you'll often have it stored on a database. In this post, I'll show how to use an Azure SQL database to write and read data then use that data to build an ML.NET machine learning model. I'll also show how to save the model into an Azure Blob Storage container so other applications can use it.

The code can be found on GitHub. For a video going over the code, check below.

The Data

The data used will be the wine quality data that's on Kaggle. This has several qualities of wine such as its Ph, sugar content, and whether the wine is red or white.

2019-03-26 11_57_48-Clipboard.png

The label column will be "Quality". So we will use the other characteristics of wine to predict this value, which will be from 1 to 10.

Setup

Creating Azure Resources

For a database and a place to store the model file for other code, such as an API, can read from, we'll be using Azure.

Azure SQL Database

To create the SQL database, in the Azure Portal, click New Resource -> Databases -> SQL Database.

2019-03-26 12_09_04-Clipboard.png

In the new page, fill in the required information. If creating a new SQL Server to hold the database into, keep track of the username and password you use to fill it out as it will be needed to connect to it later. Click Review + Create and, if validations pass, click Create.

2019-03-26 12_16_35-Clipboard.png

Azure Blob Storage

While the SQL Server and database are being deployed, click on New Resource -> Storage -> Storage Account

2019-03-26 12_20_02-Clipboard.png

Similar to when creating the SQL database, fill in the required items. For a blob container, make sure the Account kind is set to Container.

2019-03-26 12_51_21-Clipboard.png

Creating Database Table

Before we can start writing to the database, the table we'll be writting to needs to be created. You can use Azure Data Studio, which is a light weight version of SQL Server Management Studio, to connect to the database earlier using the user and password and then use the below script to create the table. The script just has columns corresponding to the columns in the data file with an added ID primary key column.

CREATE TABLE dbo.WineData
(
    ID int NOT NULL IDENTITY,
    Type varchar(10) not null,
    FixedAcidity FLOAT not null,
    VolatileAcidity FLOAT not null,
    CitricAcid FLOAT not null,
    ResidualSugar FLOAT not null,
    Chlorides FLOAT not null,
    FreeSulferDioxide FLOAT not null,
    TotalSulfurDioxide FLOAT not null,
    Density FLOAT not null,
    Ph FLOAT not null,
    Sulphates FLOAT not null,
    Alcohol FLOAT not null,
    Quality FLOAT not null
)

Code

The code will be done in a .NET Core Console project in Visual Studio 2017.

NuGet Packages

Before we can really get started the following NuGet packages need to be installed:

  • Microsoft.ML
  • Microsoft.Extensions.Configuration
  • Microsoft.Extensions.Configuration.Json
  • System.Data.SqlClient
  • WindowsAzure.Storage

Config File

In order to use the database and Azure Blob Storage we just created, we will have a config JSON file instead of hard coding our connection strings. The config file will look like this:

{
  "sqlConnectionString": "<SQL Connection String>",
  "blobConnectionString": "<Blob Connection String>"
}

Also, don't forget to mark this file to copy in its properties.

2019-03-27 05_33_19-Clipboard.png

The connection strings can be obtained on the resources in the Azure Portal. For the SQL database connection string, go to the Connection strings section and you can copy the connection string from there.

2019-03-27 05_39_25-Clipboard.png

You will need to update the connection string with the username and password that you used when creating the SQL server.

For the Azure Blob Storage connection string, go to the Access keys section and there will be a key that can be used to connect to the storage account and under that will be the connection string.

2019-03-27 05_44_49-Clipboard.png

Writing to Database

Since we just created the SQL server, database, and table, we need to add the data to it. Since we have the System.Data.SqlClient package, we can use SqlConnection to connect to the database. Note that, an ORM like Entity Framework can be used instead of the methods from the System.Data.SqlClient package.

Real quick, though, let's set up by adding a couple of fields on the class. One to hold the SQL connection string and another to have a constant string of the file name for the model we will create.

private static string _sqlConectionString;
private static readonly string fileName = "wine.zip";

Next, let's use the ConfigurationBuilder to build the configuration object and to allow us to read in the config file values.

var builder = new ConfigurationBuilder()
    .SetBasePath(Directory.GetCurrentDirectory())
    .AddJsonFile("config.json");

var configuration = builder.Build();

With the configuration built, we can use it to pull out the SQL connection string and assign it to the field created earlier.

_sqlConectionString = configuration["connectionString"];

To write the data into the database we need to read in from the file. I put the file in the solution and make sure it can be read using the same method as the config file to make sure it gets copied over.

Using LINQ, we can read from the file and parse out each of the columns into a WineData object.

var items = File.ReadAllLines("./winequality.csv")
    .Skip(1)
    .Select(line => line.Split(","))
    .Select(i => new WineData
    {
        Type = i[0],
        FixedAcidity = Parse(i[1]),
        VolatileAcidity = Parse(i[2]),
        CitricAcid = Parse(i[3]),
        ResidualSugar = Parse(i[4]),
        Chlorides = Parse(i[5]),
        FreeSulfurDioxide = Parse(i[6]),
        TotalSulfurDioxide = Parse(i[7]),
        Density = Parse(i[8]),
        Ph = Parse(i[9]),
        Sulphates = Parse(i[10]),
        Alcohol = Parse(i[11]),
        Quality = Parse(i[12])
    });

The WineData class holds all of the fields that are in the data file.

public class WineData
{
    public string Type;
    public float FixedAcidity;
    public float VolatileAcidity;
    public float CitricAcid;
    public float ResidualSugar;
    public float Chlorides;
    public float FreeSulfurDioxide;
    public float TotalSulfurDioxide;
    public float Density;
    public float Ph;
    public float Sulphates;
    public float Alcohol;
    public float Quality;
}

There's an additional Parse method added to all but one of the fields. That's due to us getting back a string value of the data, but our class says it should be of type float. The Parse method is fairly straight forward in that it just tries to parse out the field and if it can't it uses the default value of float, which is 0.0.

private static float Parse(string value)
{
    return float.TryParse(value, out float parsedValue) ? parsedValue : default(float);
}

Now that we have the data, we can save it to the database. In a using statement, new up an instance of SqlConnection and pass in the connection string as the parameter. Inside here, we need to call the Open method of the connection and then create an insert statment. Then, loop over each item from the results of reading in the file and add each field from the item as parameters for the insert statement. After that, call the ExecuteNonQuery method to execute the query on the database.

using (var connection = new SqlConnection(_sqlConectionString))
{
    connection.Open();

    var insertCommand = @"INSERT INTO dbo.WineData VALUES
        (@type, @fixedAcidity, @volatileAcidity, @citricAcid, @residualSugar, @chlorides,
         @freeSulfureDioxide, @totalSulfurDioxide, @density, @ph, @sulphates, @alcohol, @quality);";

    foreach (var item in items)
    {
        var command = new SqlCommand(insertCommand, connection);

        command.Parameters.AddWithValue("@type", item.Type);
        command.Parameters.AddWithValue("@fixedAcidity", item.FixedAcidity);
        command.Parameters.AddWithValue("@volatileAcidity", item.VolatileAcidity);
        command.Parameters.AddWithValue("@citricAcid", item.CitricAcid);
        command.Parameters.AddWithValue("@residualSugar", item.ResidualSugar);
        command.Parameters.AddWithValue("@chlorides", item.Chlorides);
        command.Parameters.AddWithValue("@freeSulfureDioxide", item.FreeSulfurDioxide);
        command.Parameters.AddWithValue("@totalSulfurDioxide", item.TotalSulfurDioxide);
        command.Parameters.AddWithValue("@density", item.Density);
        command.Parameters.AddWithValue("@ph", item.Ph);
        command.Parameters.AddWithValue("@sulphates", item.Sulphates);
        command.Parameters.AddWithValue("@alcohol", item.Alcohol);
        command.Parameters.AddWithValue("@quality", item.Quality);

        command.ExecuteNonQuery();
    }
}

We can run this and check the database to make sure the data got added.

2019-03-27 06_13_22-Clipboard.png

Reading from Database

Now that we have data in our database let's read from it. This code will be similar than what we used to write to the database by using the SqlConnection class again. In fact, the only differences is the query we send to it and how we read in the data.

We do need a variable to add each row to, though, so we can create a new List of WineData objects.

var data = new List<WineData>();

Within the SqlConnection we can create a select statement that will return all of the columns and execute it with the ExecuteReader function. This returns a SqlDataReader object and we can use that to extract out the data.

In a while loop, which checks that the reader can read the next row, use the List variable created earlier to add a new instance of the WineData object to it and we can map from the reader to the object using the reader.GetValue method. The GetValue parameter will be the column position and then we'll do a ToString on it. Note that we need the Parse method from above again here to parse the strings into a float.

using (var conn = new SqlConnection(_sqlConectionString))
{
    conn.Open();

    var selectCmd = "SELECT * FROM dbo.WineData";

    var sqlCommand = new SqlCommand(selectCmd, conn);

    var reader = sqlCommand.ExecuteReader();

    while (reader.Read())
    {
        data.Add(new WineData
        {
            Type = reader.GetValue(0).ToString(),
            FixedAcidity = Parse(reader.GetValue(1).ToString()),
            VolatileAcidity = Parse(reader.GetValue(2).ToString()),
            CitricAcid = Parse(reader.GetValue(3).ToString()),
            ResidualSugar = Parse(reader.GetValue(4).ToString()),
            Chlorides = Parse(reader.GetValue(5).ToString()),
            FreeSulfurDioxide = Parse(reader.GetValue(6).ToString()),
            TotalSulfurDioxide = Parse(reader.GetValue(7).ToString()),
            Density = Parse(reader.GetValue(8).ToString()),
            Ph = Parse(reader.GetValue(9).ToString()),
            Sulphates = Parse(reader.GetValue(10).ToString()),
            Alcohol = Parse(reader.GetValue(11).ToString()),
            Quality = Parse(reader.GetValue(12).ToString())
        });
    }
}

Creating the Model

Now that we have our data from the database, let's use it to create an ML.NET model.

First thing, though, let's create an instance of the MLContext.

var context = new MLContext();

We can use the LoadFromEnumerable helper method to load the IEnumerable data that we have into the IDataView that ML.NET uses. In previous versions of ML.NET this used to be called ReadFromEnumerable.

var mlData = context.Data.LoadFromEnumerable(data);

Now that we have the IDataView we can use that to split the data into a training set and test set. In previous versions of ML.NET this returned a tuple and it could be deconstructed into two variables (var (trainSet, testSet) = ...), but now it returns an object.

var testTrainSplit = context.Regression.TrainTestSplit(mlData);

With the data set up, we can create the pipeline. The two main things to do here is to set up the Type feature, which denotes if the wine is red or white, as one hot encoded. Then we concatenate each of the other features into a feature array. We'll use the FastTree trainer and since our label column isn't named "Label", we set the labelColumnName parameter to the name of the label we want to predict, which is "Quality".

var pipeline = context.Transforms.Categorical.OneHotEncoding("TypeOneHot", "Type")
                .Append(context.Transforms.Concatenate("Features", "FixedAcidity", "VolatileAcidity", "CitricAcid",
                    "ResidualSugar", "Chlorides", "FreeSulfurDioxide", "TotalSulfurDioxide", "Density", "Ph", "Sulphates", "Alcohol"))
                .Append(context.Regression.Trainers.FastTree(labelColumnName: "Quality"));

With the pipeline created, we can now call the Fit method on it with our training data.

var model = pipeline.Fit(testTrainSplit.TrainSet);

Save Model

With our new model, let's save it to Azure Blob Storage so we can retrieve it to build an API around the model.

To start, we'll use the connection string that we put in the config earlier. We then pass that into the Parse method of the CloudStorageAccount class.

var storageAccount = CloudStorageAccount.Parse(configuration["blobConnectionString"]);

With a reference to the storage account, we can now use that to create a client and use the client to create a reference to the container that we will call "models". This container will need to be created in the storage account, as well.

var client = storageAccount.CreateCloudBlobClient();
var container = client.GetContainerReference("models");

With the container reference, we can create a blob reference to a file, which we created earlier as a field.

var blob = container.GetBlockBlobReference(fileName);

To save the model to a file, we can create a file stream using File.Create and inside the stream we can call the context.Model.Save method.

using (var stream = File.Create(fileName))
{
    context.Model.Save(model, stream);
}

And to upload the file to blob storage, just call the UploadFromFileAsync method. Note that this method is async, so we need to mark the containing method as async and add await in front of this method.

await blob.UploadFromFileAsync(fileName);

After running this, there should now be a file added to blob storage.

2019-03-27 06_42_08-Clipboard.png

Hope this was helpful. In the next part of this end-to-end series, we will show how to create an API that will load the model from Azure Blob Storage and use it to make predictions.

Clustering in ML.NET

Clustering is a well known type of unsupervised machine learning algorithm. It is unsupervised since there isn't usually a known label in the data to help the algorithm know how to train on a known value. Instead of training on the data point to see a pattern in how it got a label value, an unsupervised algorithm will find patterns among each of the data points themselves. In this post, I'll go over how to use the clustering trainer in ML.NET.

This example will be using ML.NET version 0.11. Sample code is on GitHub.

For a video version of this example, check out the video below.

The Data

The data I'll be using is the wheat seed data that can be found on Kaggle. This data has properties of wheat seeds such as area, perimeter, length and width of each seed, etc. These properties measure what variety of wheat the seed is. Whether it is the variety of Kama, Rosa, or Canadian.

Project Setup

For the code, I'll create a new .NET Core Console project and bring in ML.NET as a NuGet package. For the data, I like to put them in the project itself so it can be easier to work with. When doing that, don't forget to mark the file to copy or copy if newer so it can be read when running the project.

2019-03-09 13_57_16-Clipboard.png

Loading Data

To start off, instantiate an instance of the ML Context.

var context = new MLContext();

To read in the data, use the CreateTextLoader method on the context.Data peroperty. This will take in an array of TextLoader.Column objects. In each of these object's constuctor pass in the name of the column, what data type it is which all of ours will be DataKind.Single to represent a float, and the position in the file where the column is. Then, as other parameters to the CreateTextLoader method, pass in that it has a header and that the separator is a comma.

var textLoader = context.Data.CreateTextLoader(new[]
{
    new TextLoader.Column("A", DataKind.Single, 0),
    new TextLoader.Column("P", DataKind.Single, 1),
    new TextLoader.Column("C", DataKind.Single, 2),
    new TextLoader.Column("LK", DataKind.Single, 3),
    new TextLoader.Column("WK", DataKind.Single, 4),
    new TextLoader.Column("A_Coef", DataKind.Single, 5),
    new TextLoader.Column("LKG", DataKind.Single, 6),
    new TextLoader.Column("Label", DataKind.Single, 7)
},
hasHeader: true,
separatorChar: ',');

With our data schema defined we can use it to load in the data. This is done by calling the Load method on the loader we just created above and pass in the file location.

IDataView data = textLoader.Load("./Seed_Data.csv");

Now that the data is loaded let's use it to get a training and test set. We can do that with the context.Clustering.TrainTestSplit method. All this takes in is the IDataView that we got when we loaded in the data. Optionally, we can specify what fraction of the data to get for our test set.

var trainTestData = context.Clustering.TrainTestSplit(data, testFraction: 0.2);

This returns an option that has TrainSet and TestSet properties.

Building the Model

Now that the data is loaded and we have our train and test data sets, let's now create the pipeline. We can start simple by creating a features vector and then passing that into a clustering algorithm of our choosing. Since all of the data are float columns there's no need to do any other processing to it.

var pipeline = context.Transforms.Concatenate("Features", "A", "P", "C", "LK", "WK", "A_Coef", "LKG")
    .Append(context.Clustering.Trainers.KMeans(featureColumnName: "Features", clustersCount: 3));

Using the context.Transforms property we have access to several transformations we can perform on our data. The one we'll do here is the Concatenate transform. The first parameter is the name of the new column that it will create after concatenating the specified columns. The next parameter(s) are params of all the columns to be concatenated.

Appended to the transform is the trainer, or algorithm, we want to use. In this case we'll use the K-Means algorithm. The parameters here are the column name of all the features, which we specified in the Concatenate transform as "Features". This is actually defaulted to "Features" so we don't need to specify it. We can also define the number of clusters the algorithm should try to create.

To get a preview of the data so far, we can call the Preview method on any instance of IDataView.

var preview = trainTestData.TrainSet.Preview();

To create the model, we simply just call the Fit method on the pipeline and pass in the training set.

var model = pipeline.Fit(trainTestData.TrainSet);

Evaluating the Model

With a model built, we can now do a quick evaluation on the model. To do this for clustering, use the context.Clustering.Evaluate method. We can pass in the test data set. However, we would need to transform that data set similar to what we did in the pipeline. To do this we can use the Transform method on the model and pass in our test data set.

var predictions = model.Transform(trainTestData.TestSet);

Now we can use the test data set to evaluate the model and give some metrics.

var metrics = context.Clustering.Evaluate(predictions);

We get a few metrics for clustering on the metrics object but the one I'll care about is the average minimum score. This tells us the average distance from all examples to their center point of their cluster. So the lower the number here the better the clustering is.

Console.WriteLine($"Average minimum score: {metrics.AvgMinScore}");

Predicting on Model

To make a prediction on our model we first need to create a prediction engine. To do that, call the CreatePredictionEngine method on the model. This is generic and it does specify the data input schema and the prediction classes so it knows what object to read in for a new prediction and what object to use when it makes a prediction.

public class SeedData
{
    public float A;
    public float P;
    public float C;
    public float LK;
    public float WK;
    public float A_Coef;
    public float LKG;
    public float Label;
}

public class SeedPrediction
{
    [ColumnName("PredictedLabel")]
    public uint SelectedClusterId;
    [ColumnName("Score")]
    public float[] Distance;
}

The ColumnName attribute tells the prediction engine what fields to use for those columns. This is under the Microsoft.ML.Data namespace.

To create the prediction engine, which used to be done using the CreatePredictionFunction method in previous versions of ML.NET, call it on the model and pass in the context as the parameter.

var predictionFunc = model.CreatePredictionEngine<SeedData, SeedPrediction>(context);

Now we can use the prediction engine to make predictions.

var prediction = predictionFunc.Predict(new SeedData
{
    A = 13.89F,
    P = 15.33F,
    C = 0.862F,
    LK = 5.42F,
    WK = 3.311F,
    A_Coef = 2.8F,
    LKG = 5
});

And we can get the selected cluster ID, or what cluster the model predicts the data would belong to.

Console.WriteLine($"Prediction - {prediction.SelectedClusterId}");
2019-03-09 14_49_30-Clipboard.png

5 Books To Become a Better Software Developer

This video goes over the top five books I found to help me become a better software developer. Hope you will find it useful. If you have a book that has helped you, feel free to put it in the comments.

Books in slides:

Other books mentioned in the video: