How the Machine Learning Process is Like Cooking

When creating machine learning models it's important to follow the machine learning process in order to get the best performing model that you can into production and to keep it performing well.

But why cooking? First, I enjoy cooking. But also, it is something we all do. Now, we all don't make five course meals every day or aim to be a Michelin star chef. We do follow a process to make our food, though, even if it may be to just heat it up in the microwave.

In this post, I'll go over the machine learning process and how it relates to cooking to give a better understanding of the process and maybe even a way to help remember the steps.

For the video version, check below:

Machine Learning Process

First, let's briefly go over the machine learning process. Here's a diagram that's known as the cross-industry standard process for data mining, or simply known as CRISP-DM.

The machine learning process is pretty straight forward when going through the diagram:

  • Business understanding - What exactly is the problem we are trying to solve with data

  • Data understanding - What exactly is in our data, such as what does each column mean and how does it relate to the business problem

  • Data prep - Data preprocessing and preparation. This can also include feature engineering

  • Modeling - Getting a model from our data

  • Evaluation - Evaluating the model for performance on generalized data

  • Deployment - Deploying the model for production use

Note that a couple of items can go back and forth. You may do multiple iterations of getting a better understanding of the business problem and the data, data prep and modeling, and even going back to the business problem when evaluating a model.

Notice that there's a circle around the whole process which means you may even have to go back to understanding the problem once a model is deployed.

There are a couple of items I would add to help improve this process, though. First, we need to think about getting our data. Also, I believe can add a separate item in the process for improving our model.

Getting Data

I would actually add an item before or after defining the business problem, and that's getting data. Sometimes you may have the data already and define the business problem but you may have to get the data after defining the problem. Either way, we need good data. You may have heard an old saying in programming, "Garbage in, garbage out", and that applies to machine learning as well.

We can't have a good model unless we give it good data.

Improving the Model

Once we have an algorithm we can also spend some time to improve it even further. We can deploy some techniques that can tweak the algorithm to perform better.

Now that we understand the machine learning process a bit better, let's see how it relates to cooking.

Relating the Machine Learning Process to Cooking

At first glance, you may not see how the machine learning process relates to cooking at all. But let's go into more detail of the machine learning process and how each step relates to cooking.

Business Understanding

One of the first things to do for the machine learning process is to get a business understanding of the problem.

For cooking, we know we want to make a dish, but which one? What do we want to accomplish with our dish? Is it for breakfast, lunch, or dinner? Is it for just us or do we want to create something for a family of four?

Knowing these will help us determine what we want to cook.

Getting Data

I would actually add an item before or after defining the business problem, and that's getting data. Sometimes you may have the data already and define the business problem but you may have to get the data after defining the problem. Either way, we need good data. You may have heard an old saying in programming, "Garbage in, garbage out", and that applies to machine learning as well.

We can't have a good model unless we give it good data.

Data Processing

Data processing is perhaps the most important step after getting good data. Depending on how you process the data will depend on how well your model performs.

For cooking, this is equivalent to preparing your ingredients. This includes chopping any ingredients such as vegetables, but keeping a consistent size when chopping also counts. This helps the pieces cook evenly. If some pieces are smaller they can burn or if some pieces are bigger then they may not be fully cooked.

Also, just like in machine learning there are multiple ways to process your data, there are also different ways to prepare ingredients. In fact, there's a word for processing all of your ingredients before you start cooking - mise en place - which is French for "everything in it's place". This is done in cooking shows all the time where they have everything ready to start cooking.

This actually also makes sense for machine learning. We have to have all of our data processing done on the training data before we can give it to the machine learning algorithm.

Modeling

Now it's time for the actual modeling part of the process where we give our data to an algorithm.

In cooking, this is actually where we cook our dish. In fact, we can relate choosing a recipe to choosing a machine learning algorithm. The recipe will take the ingredients and turn out a dish, and the algorithm will take the data and turn out a model.

Different recipes will turn out different dishes, though. Take a salad, for instance. Depending on the recipe and the ingredients, the salad can turn out to be bright and citrusy like this kale citrus salad. Or, it can be warm and savory like this spinach salad with bacon dressing.

They're both salads, but they are turned into different kinds of salads because of different ingredients and recipes. In machine learning, you can have similar models from different data and algorithms.

What if you have the same ingredients? There are definitely different ways to make the same recipe. Hummus is traditionally made with chickpeas, tahini, garlic, and lemon like in this recipe. But there is also this hummus recipe that has the same ingredients but the recipe is just a bit different.

Optimizing the Model

Depending on the algorithm the machine learning model is using we can give it different parameters that can optimize the model for better performance. These parameter are called hyperparameters, which is used during the learning process of the model to your data.

These can be updated manually by you choosing values for the hyperparameters. This can be quite tedious and you never know what value to choose. So, instead, there are ways this can be automated by giving a range of values and running the model multiple times with different values and you can use the best performing model that is found.

How do we optimize a dish, though? Perhaps the best way to get the best taste out of your dish, other than using the best ingredients, is to season it. Specifically, seasoning with salt. In this video by Ethan Chlebowski, he suggests

…home cooks severely under salt the food they are cooking and is often why the food doesn't taste good.

He even quotes this line from the book Ruhlman's Twenty:

How to salt food is the most important skill to know in the kitchen.

I've even experienced this in my own cooking where I don't add enough salt. Once I do, the dish tastes 100 times better.

Now, adding salt to your dish is the more manual way of optimizing it with seasoning. Is there a way that this can be automated? Actually, there is! Instead of using just salt and adding other spices to it yourself you can get these seasoning blends that has all the spices in it for you!

Evaluating the Model

Evaluating the model is going to be one of the most important steps because this tells you how well your model will perform on new data, or rather, data that it hasn't seen before. During training your model have good performance, but giving it new data may reveal that it actually is performing bad.

Evaluating your cooked dish is a lot more fun, though. This is where you get to eat it! You will determine if it's a good dish by how it tastes. Is it good or bad? If you served it to others, what did they think about it?

Iterating on the Model

Iterating on the model is a part of the process that may not seem necessary, but it can be an important one. Your data may change over time which would then make your model stale. That is, it's relying on data that it used to but due to some process change or something similar it no longer does. And since the underlying data changed the model won't predict as well as it did.

Similarly, you may have more or even better data that you can use for training, so you can then retrain the model with that to make better predictions.

How can you iterate on a dish that you just prepared? First thing is if it was good or bad. If it was bad, then we can revisit the recipe and see if we did anything wrong. Did we overcook it? Did we miss an ingredient? Did we prepare an ingredient incorrectly?

If it was good, then we can iterate on it

A lot of chefs and home cooks like to take notes about recipes they've made. They write in some tricks they've learned along the way but also some different paths from the recipe that they either had to take due to a missing ingredient or preferred to take.

Conclusion

Hopefully, this helps your better understand the machine learning process through the eyes of cooking a dish. It may even help you understand the importance of each step because, in cooking, if one step is missed then you probably won't be having a good dinner tonight.

And if you're wondering where does AutoML fit into all of this, then you can think of it as the meal delivery kits like Hello Fresh or Blue Apron. They do a lot of the work for you and you just have to put it all together.

What's New in the Model Builder Preview

The ML.NET graphical tool, Model Builder, continues to get better and better for everyone to work with and, most important, for everyone to get into machine learning. Recently, there have been some really good additions to Model Builder that we will go over in this post. We will go through the entire flow for Model Builder and will highlight each of the new items.

If you prefer to see a video of these updates, check the video below.

The team is testing out these new preview items so it currently needs to be opt-in through this Microsoft form in order to participate in it. Once you sign up there you will receive an email with instructions on how to install the preview version.

For even more information about this version of Model Builder and ML.NET version 1.5.5, checkout this Microsoft blog post.

The data for this post will be this NASA Asteroids Classification dataset. We will use this to determine if an asteroid can be potentially hazardous or not. That is, if it would come close to Earth enough to be a threat.

Perhaps the biggest addition to the preview version is the new Model Builder config file. Let's look at this being used in action.

Once you have the preview version installed perform the same steps as usual to bring up Model Builder by right clicking on a project and selecting Add -> Machine Learning. It will now bring up a dialog for your Model Builder project.

post1-1.png

Here we can give our Model Builder project a name. We'll name it Asteroids and click to continue. Now the regular Model Builder window shows up, but if you look at the Solution explorer there was a new file added. It was that mbconfig file. We will look at what's in this file later.

We can use Model Builder like usual through the first couple of steps. We'll choose the Classification scenario and will train this locally. Then, we'll add the file and this may take a few seconds since there's a lot of data in here.

Once it's loaded we can specify the label column, which will be the "Hazardous" column at the end.

Let's now explore our updated data options that we get with this preview version. To get there, select the "Advanced data options" link below where you choose where the data is located. This opens a new dialog that shows how we can update the data options. These will be auto-filled based on what Model Builder determines from the data. If you want to override them, these options are available.

Note that there's a small bug in the current version for dark theme of Visual Studio. I have created an issue to let the team know about it. For this section, I'll use the light theme.

post1-2.png

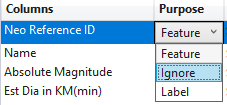
The first section, after the column names, is what purpose the column is. Is it a feature or a label? If it's neither we can select to ignore the column.

post1-3.png

The second section is what data type the column is. You can choose either a string, single (or float), or boolean.

post1-4.png

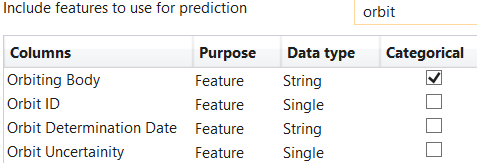
The last section is a checkbox to tell Model Builder if this column is a categorical feature, meaning that there are a distinct number of string entries in there. Model Builder already determined that the "Orbiting body" column is categorical.

post1-5.png

Also, notice that we can filter out the columns with the text field on the upper right. So if I wanted to see all the columns with "orbit" in the name I can just type that in and it will filter them out for me. This is definitely helpful for datasets that have a lot of features.

post1-6.png

Compare this to what we had in the previous version. These new options give you the same thing, but they are now simpler and show more within the dialog.

post1-7.png

The data formatting options haven't changed, though. That's where you can specify if the data has a header row, what the delimiter is, or specify if the decimals in the file use a dot (.) or a comma (,).

Now we can train our model. I'll set the train time to be 20 seconds and fire it off to see how it goes.

Our top five models actually look pretty good. The top trainer has micro and macro accuracies at around 99%!

|                                 Top 5 models explored                                   |
-------------------------------------------------------------------------------------------
|     Trainer                          MicroAccuracy  MacroAccuracy  Duration #Iteration  |
|11   FastForestOva                      0.9980         0.9988       1.0         11       |
|12   FastTreeOva                        0.9960         0.9882       0.9         12       |
|9    FastTreeOva                        0.9960         0.9882       0.8          9       |
|0    FastTreeOva                        0.9960         0.9882       2.0          0       |
|10   LinearSvmOva                       0.9177         0.8709       2.5         10       |
-------------------------------------------------------------------------------------------

Let's now go straight to the consume step. There's a bit more information here than the previous version.

post1-8.png

Here they give you the option to add consuming the model as projects within your current solution. Keep a watch on this page, though, as I'm sure more options will be coming. They also give you some sample data in which you can use to help test the consumption of your model.

Now, let's take a moment and look again at our mbconfig file. In fact, you will notice a couple of more files here.

post1-9.png

There are now consumption and training files that we can look at. These files are similar to the training and consuming projects that would get added to your solution but you don't have to add them as separate projects if you don't want.

By the way, if for any reason, we need to close the dialog and come back to it at another time to change the data options or increase the time to run we can double click on the mbconfig file to bring it back. This not only brings back the Model Builder dialog, but it also retains the state of it so we don't have to do it all over again.

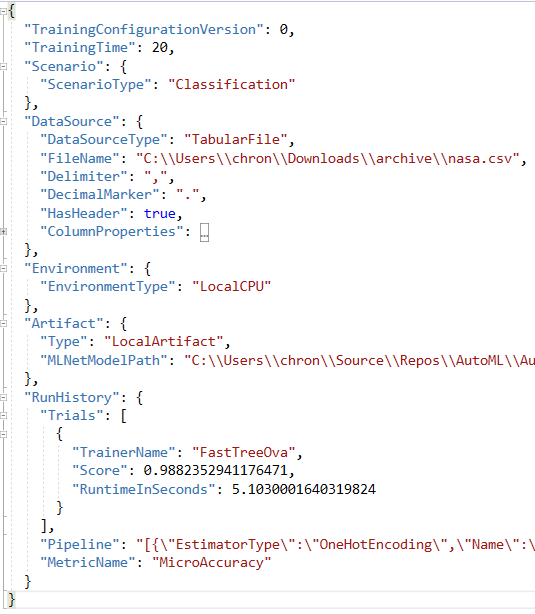
The reason for that is, if we open the mbconfig file in a JSON editor, it keeps track of everything in this file.

post1-10.png

This keeps track of everything, even the history of all of the runs within Model Builder! And, since this is a JSON file, we can keep this in version control so teams can work on this together to get the best model they can.


Hopefully, this showed how much the team has done to help improve Model Builder. Definitely give feedback on their GitHub issues page for any issues or feature requests.

How to Build the ML.NET Repository

Have you wanted to contribute a bug fix or a new feature to the ML.NET repository? The first step is to pull down the repository from GitHub and get it built successfully so you can start making changes.

The ML.NET repository has great documentation. Part of it is how to build it locally from this doc. In this post, we'll go over the steps to do this so you can do the same and get started making changes to the ML.NET repository.

For a video version of this post, check below.

Fork the Repository

The first thing to do, if you haven't already, is to fork the ML.NET repository.

image (1).png

If you haven't forked the repository yet, you're good to go to the next step. However, for me, since I have already forked the repository a while back, I need to make sure I have the latest.

There are two ways to do sync up my fork with the main repository - running git commands or letting GitHub do it for you.

Syncing the Fork

We can run some git commands to sync up. GitHub has good documentation on how to do this for a more detailed explanation.

The first thing is to is to make sure you have an upstream remote set up to point to the main repository.

To check if you have it you can run the git remote -v command. If there is only an origin remote then you would need to add an upstream remote that points to the original repository.

image (2).png

If you don't have it set, this can be set with the following command.

git remote add upstream git@github.com:dotnet/machinelearning.git

Note that I have SSH set up so I use the SSH clone link. If you don't have this set up you can use the HTTPS link instead.

After setting the upstream remote, we need to get the latest from the

git fetch upstream

Once the upstream fetched we can merge those changes into our fork. Make sure you’re in the default branch and run this command to merge in the changes.

git merge upstream/main

Now you can start working on the latest code base.

Note here that I attempted to use GitHub to sync my fork. Unfortunately, it seems to not do as good of a job as the git commands.

Install Dependencies

Before we can start to build the code, there is a dependency we need to install. This dependency is included with a git submodule.

If you run the build before this step you will get errors, so it's best to do this before running the build.

To install the submodule dependencies, run the below command.

git submodule update --init

With the submodules installed we can now run the build through the command line.

Build on the Command Line

The build command is made very well in the ML.NET repository so there's very little you have to do to actually run it. We can run this on the command line. The script you run will depend on if you use Windows or Linux/Mac.

For Windows, you would run build.cmd and for Mac/Linux you would run build.sh.

The first time you run it will take a while. It needs to download several assets, such as NuGet packages and models for testing. After you download all of this, though, subsequent builds will go much faster.

Build in Visual Studio

With the main build now complete we can now build within Visual Studio. Although, currently, you may get an error in the Microsoft.ML.Samples.GPU project.

image (3).png

Why do we get this error in Visual Studio and not when we ran the build on the command line? It turns out that Visual Studio was set to have compile errors on warnings. There are a couple of things you can do to fix this.

First, since this is a samples project, the simplest thing is to just comment out the method. Instead of doing that, though, we can update the build properties of the project. We can either set the "treat warnings as errors" to "None".

image (4).png

Or, we can update the "Suppress warnings" to specify this specific warning. To get the warning we can go back and highlight the error with our cursor which will bring up a tooltip describing the error. It has a link to the CS0618 warning. We can put in the number in the "suppress warnings" section, 0618, and save the project.

image (5).png

Now we can fully build the solution in Visual Studio. Although, take note about this change when committing any other changes. You can either not include this change or include it and make a comment to discuss with the ML.NET team about it.


Hopefully, this post helps you get started to contribute to the ML.NET repository. If you make a contribution to the ML.NET repository, please let me know and we can celebrate!


Perform Linear Regression in Azure Databricks with MLLib

When thinking of performing machine learning, especially in Python, a few frameworks may come to mind such as scikit-learn, Tensorflow, and PyTorch. However, if you're already doing your big data processing in Spark, then it actually comes with its own machine learning framework - MLLib.

In this post, we'll go over using MLLib to create a regression model within Azure Databricks. The data we'll be using is the Computer Hardware dataset from the UCI Machine Learning Repository. The data will be on an Azure Blob storage container, so we'll need to fetch the data from there to work with it.

What we would want to predict from this data is the published performance of the machine based off of its features. There is a second performance column at the end, but looking at the data description that is what the original authors predicted using their algorithm. We can safely ignore that column.

If you would prefer a video version of this post, check below.

Connecting to Azure Storage

Within a new notebook, we can set some variables, such as the storage account name and what container the data is in. We can also get the storage account key from the Secrets utility method.

storage_account_name = "databricksdemostorage"
storage_account_key = dbutils.secrets.get("Keys", "Storage")
container = "data"

After that we can set a Spark config setting specifically within Azure Databricks that can connect the Spark APIs to our storage container.

spark.conf.set(f"fs.azure.account.key.{storage_account_name}.blob.core.windows.net", storage_account_key)

For more details on connecting to Azure Storage from Azure Databricks, check out this video.

post1.png

Using the APIs we can use the read property on the spark variable (which is the SparkSession) and set some options such as telling it to automatically infer the schema and what the delimiter is. Then the csv method is called with the Windows Azure Storage Blob URL (WASB), which is built on top of HDFS. With the data fetched we then call the show method on it.

However, looking at the data, it defaults the column names. Since we'll be referencing the columns, it'll be nice to have names to them to make referencing them easier. To do this we can create our own schema and use that when reading the data.

To read the schema we'll need to create it using StructType and StructField which help specify a schema for a Spark DataFrame. Don't forget to import these from pyspark.sql.types.

from pyspark.sql.types import StructType, StructField, StringType, DoubleType

schema = StructType([
  StructField("Vendor", StringType(), True),
  StructField("Model", StringType(), True),
  StructField("CycleTime", DoubleType(), True),
  StructField("MinMainMemory", DoubleType(), True),
  StructField("MaxMainMemory", DoubleType(), True),
  StructField("Cache", DoubleType(), True),
  StructField("MinChannels", DoubleType(), True),
  StructField("MaxChannels", DoubleType(), True),
  StructField("PublishedPerf", DoubleType(), True),
  StructField("RelativePerf", DoubleType(), True)
])

With this schema set we can pass that into the read property with the schema method and pass this in as the parameter. Since we pass in the schema we no longer need the inferSchema option. Also, we can now tell Spark to use a header row.

data = spark.read.option("header", "true").option("delimeter", ",").schema(schema)
  .csv(f"wasbs://.blob.core.windows.net/machine.data")

data.show()
post2.png

Splitting the Data

With our data now set, we can start building our linear regression machine learning model with it. The first thing to do, though, is to split our data into a training and testing set. We can do this with the randomSplit method on the Spark DataFrame.

(train_data, test_data) = data.randomSplit([0.8, 0.2])

The randomSplit method takes in a list as a parameter and the first item of the list is how much to keep in the training set and the second item is how much to take in the testing set. This returns a tuple which is why there are parentheses around the variables.

Just because I'm curious, let's see what the count of each of these dataframes are.

print(train_data.count())
print(test_data.count())
post3.png

Creating Linear Regression Model

Before we can go further, we need to make some additional imports. We need to import the LinearRegression class, a class to help us vectorize our features, and a class that can help us evaluate our model based on the test data.

from pyspark.ml.regression import LinearRegression
from pyspark.ml.feature import VectorAssembler
from pyspark.ml.evaluation import RegressionEvaluator

Now, we can begin building our machine learning model. The first thing we need is to create a "features" column. This column will be an array of all of our numerical columns. This is what the VectorAssembler class can do for us.

vectors = VectorAssembler(inputCols=['CycleTime', 'MinMainMemory', 'MaxMainMemory', 'Cache', 'MinChannels', 'MaxChannels'], outputCol="features")

vector_data = vectors.transform(train_data)

For the VectorAssembler we give it a list of input columns that we want to vectorize into a single column. There's also an output column parameter in which we specify what we want the name of the new column to be.

NOTE: To keep this simple, I'll exclude the text columns. Don't worry, though, we'll go over how to handle this in a future post/video.

We can call the show method on the vector data to see how that looks.

vector_data.show()
post4.png

Notice the "features" column was appended on to the DataFrame. Also, you can tell that the values match each value in the other columns in that row. For instance, the first value in the "features" column is 29 and the first value in the "CycleTime" column is 29.

Let's clean up the DataFrame a bit and only have the columns we care about, the "features" and "RelativePerf" columns. We can do that just by using the select method.

features_data = vector_data.select(["features", "PublishedPerf"])

features_data.show()
post5.png

With our data now updated to the format the algorithm wants, let's actually create the model. This is where we use the LinearRegression class from the import.

lr = LinearRegression(labelCol="PublishedPerf", featuresCol="features")

With that class we give it a couple of parameters in the constructor, what the label column name is and what the name of the features column is.

Now we can fit the model based on our data.

model = lr.fit(features_data)

And now we have our model! We can look into it by getting the model summary and examining the R Squared on it.

summary = model.summary

print("R^2", summary.r2
post6.png

From here, it looks like it performs quite well with an R Squared of around 91%. But let's evaluate the model on the test data set. This is where we use the RegressionEvaluator class we imported.

evaluator = RegressionEvaluator(predictionCol="prediction", labelCol="PublishedPerf", metricName="r2")

This takes in a few constructor parameters which include the label column name, the metric name we want to use for our evaluation, and the prediction column. The prediction column we'll get when we when we run the model on our test set.

With our evaluator defined, we can now start to pass data to it. But first, we actually need to make our test dataset into the same format that we did our training data set. So we'll need to follow the same steps to vectorize our data.

vector_test = vectors.transform(test_data)

Then, select the columns we care about using.

features_test = vector_test.select(["features", "PublishedPerf"])

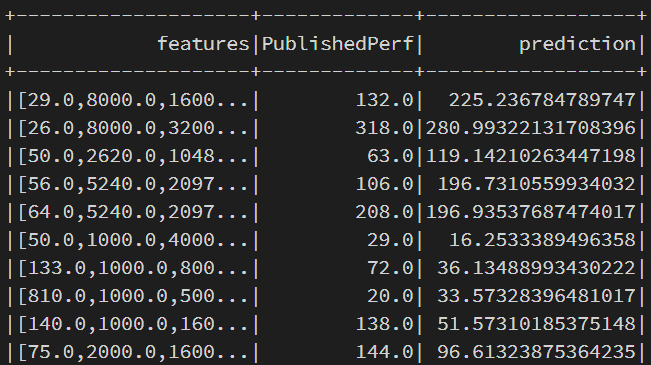
Now we can use the model to make predictions on our test data set and we'll show those results.

test_transform = model.transform(features_test)

test_transform.show()
post7.png

The prediction column are the predicted values. You can do a bit of a comparison to that and the "PublishedPerf" column. Do you think this model will perform well based on what you see?

With the predictions on the test dataset we can now evaluate our model based on that data.

evaluator.evaluate(test_transform)
post8.png

Looks like the model doesn't perform very well with this R Squared being 56%, so there is probably some feature engineering we can do.

If you watched the video and saw that the evaluation returned 90%, then it's possible the split got different data that caused this discrepancy. This is a good reason to run cross validation on your data.


Hopefully, you've learned some things with this post about using MLLib in Azure Databricks. Things to take away is that MLLib is built into Spark and, therefore, built into Azure Databricks so there's no need to install another library to perform machine learning on your data.

ML.NET Predictions on the Web in F# with the SAFE Stack

Building web sites in C# has be something that you could do for quitea while. But, did you know that you can do web sites in F#? Enter the SAFE Stack. An all-in-one framework that allows you to use F# on the server, but also allows you to use F# on the client side. That's right, no more JavaScript for the client side!

For a video version of this post, checkout the video below.

Introduction to the SAFE Stack

The SAFE Stack is built on top of these components:

  • Saturn
  • Azure
  • Fable
  • Elmish

Let's go into each of these in a bit more detail.

Saturn

Saturn is a backend framework built in F#. Saturn privides several parts to help us build web applications, such as the application lifecycle, a router, controllers, and views.

Azure

Azure is Microsoft's cloud platform. This is mostly used for hosting our website and any other cloud resources that we may need, such as Azure Blob Storage for files or Azure Event Hub for real time streaming data.

Fable

Fable is a JavaScript compiler. Similar to how TypeScript compiles into JavaScript, Fable does the same, except that you write F# and it compiles into JavaScript.

Elmish

The Elmish concept builds on top of Fable to provide a model-view-update pattern that is popularized in the Elm programming language.

Creating a Project

The best way to create a SAFE Stack project is to follow the steps in the documentation, but I'll highlight them here. By the way, their documentation is great!

There is a .NET template created to make creating a SAFE project much easier than manually putting it together.

To install the template, run the below command.

dotnet new -i SAFE.Template

1.png

Once the template is installed, make a new directory to keep the project files.

mkdir MLNET_SAFE

Then, you can use the .NET CLI to create a new project from the template with another command and specify the name of the project.

dotnet new SAFE -n MLNET_SAFE

Once that finishes, run the command to restore the tools used for the project. Specifically, the FAKE tool, which is used to build and run the project.

dotnet tool restore

2.png

With that done we can now run the app! To do that run the FAKE command with the run target.

dotnet fake build --target run

3.png

This is going to perform the following steps (which can be found in the build.fsx file):

  • Clean the solution
  • Run npm install to install client side dependencies
  • Compiles the projects
  • Run the projects in watch mode

When that completes, you can navigate to http://localhost:8080. We now have a running instance of the SAFE Stack!

4.png

The template is a todo app which helps show different aspects of the SAFE Stack. Feel free to explore the app and the code before continuing.

Adding ML.NET

The Model

For the ML.NET model, I'll be using the salary model that was created in the below video. It's a simple model with a small dataset to go over more of the F# and ML.NET nuances than working with the data itself.

In the Server project, add a new folder called "MLModel". In there, we can add the model file that was generated from the above video. We would also need to update the properties on the file to allow it to output during build.

Note that this can easily be in Azure Blob Storage instead and use the SDK to retrieve and download it from there.

5.png

Next, for the Server and Shared projects, add the Microsoft.ML NuGet packge. At this time, it's at version 1.5.4.

6.png

Updating the Shared File

Now we can update the file in the Shared project. We can put types and methods in this file that we know will be used in more than one other project. For our case, we can use the model input and output schemas.

type SalaryInput = {
    YearsExperience: float32
    Salary: float32
}

[<CLIMutable>]
type SalaryPrediction = {
    [<ColumnName("Score")>]
    PredictedSalary: float32
}

The SalaryInput class has two properties that are both of type float32. The SalaryPrediction class is special where we need to put the CLIMutable attribute on it. That has one property that's also of type float32. This property has the ColumnName attribute on it to map to the output column from the ML.NET model.

There's one other type we can add to our shared file. We can create an interface that has a method to get our predictions that can be called from the client to the server.

type ISalaryPrediction = { getSalaryPrediction: float32 -> Async<string> }

In this type, we create a method signature called getSalaryPrediction which takes in a paramter of type float32 and it returns a type of Async of string. So this method is asynchornous and will return a string result.

Updating the Server

Next, we can update our server file. This file contains the code to run the web server and any other methods that we may need to call from the client.

To run the web app you have the following code:

let webApp =
    Remoting.createApi()
    |> Remoting.withRouteBuilder Route.builder
    |> Remoting.fromValue predictionApi
    |> Remoting.buildHttpHandler

let app =
    application {
        url "http://0.0.0.0:8085"
        use_router webApp
        memory_cache
        use_static "public"
        use_gzip
    }

run app

The app variable creates an application instance and sets some properties of the web app, such as what the URL is, what router to use, and to use GZip compression. You can also add items such as using OAuth, set logging, or enable CORS.

The webApp variable creates the API and builds the routing. Both of these are based on the predictionApi variable which is based off the ISalaryPrediction type we defined in the shared file.

let predictionApi = { getSalaryPrediction =
    fun yearsOfExperience -> async {
        let prediction = prediction.PredictSalary yearsOfExperience
        match prediction with
        | p when p.PredictedSalary > 0.0f -> return p.PredictedSalary.ToString("C")
        | _ -> return "0"
    } }

The API has the one method we defined in the interface - getSalaryPrediction. This is where we implement that interface method. It takes in a variable, yearsOfExperience, and it runs an async method defined by the async keyword. In the brackets is what it should run.

All we are running in there is to use a prediction variable to call the PredictSalary method on it and pass in the years of experience variable to it. With the value from that we do a match expression and if the PredictedSalary property is greater than 0 we return that property formatted as a currency. If it is 0 or below, we just return the string "0".

But where did the prediction variable come from? Just above the API implementation, a new Prediction type is created.

type Prediction () =
    let context = MLContext()

    let (model, _) = context.Model.Load("./MLModel/salary-model.zip")

    let predictionEngine = context.Model.CreatePredictionEngine<SalaryInput, SalaryPrediction>(model)

    member __.PredictSalary yearsOfExperience =
        let predictedSalary = predictionEngine.Predict { YearsExperience = yearsOfExperience; Salary = 0.0f }

        predictedSalary

This creates the instance of the MLContext. It also loads in the model file, and creates a PredictionEngine instance from the model. Remember the SalaryInput and SalaryPrediction types are from the shared project. And notice that, when we load from the model, it returns a tuple. The first value returns the model whereas the second value returns the DataViewSchema. Since we don't need the DataViewSchema in our case, we can ignore it using an underscore (_) for that variable.

This type also creates a member method called PredictSalary. This is where we call the predictionEngine.Predict method and give it an instance of SalaryInput. Because F# is really good at inferring types, we can just give it the YearsExperience property and it knows that it is the SalaryInput type. We do need to supply the Salary property as well, but we can just set that to 0.0. Then, we return the predicted salary from this method. In F# we don't need to specify the return keyword. It automatically returns if it's the last item in the method.

Updating the Client

With the server updated to do what we need, we can now update the client to use the new information. Everything we need to update will be in the Index.fs file.

There are a few Todo items that it's trying to use here from the Shared project. We'll have to update these to use our new types.

First, we have the Model type. This is the state of our client side information. For the Todo application, it has two properties, Todos and Input. The Input property is the current input in the text box and the Todos property are the currently displayed Todos. So to update this we can change the Todos property to be PredictedSalary to indicate the currently predicted salary from the input of the years of experience. This property would need to be of type string.

type Model =
    { Input: string
      PredictedSalary: string }

The next part to update is the Msg type. This represents the different events that can update the state of your application. For todos, that can be adding a new todo or getting all of the todos. For our application we will keep the SetInput message to get the value of our input text box. We will remove the others and add two - PredictSalary and PredictedSalary. The PredictSalary message will initiate the call to the server to get the predicted salary from our model, and the PredictedSalary message will initiate when we got a new salary from the model so we can update our UI.

type Msg =
    | SetInput of string
    | PredictSalary
    | PredictedSalary of string

For the todosApi we simply rename it to predictionApi and change it to use the ISalaryPrediction instead of the ITodosApi.

let predictionApi =
    Remoting.createApi()
    |> Remoting.withRouteBuilder Route.builder
    |> Remoting.buildProxy<ISalaryPrediction>

The init method can be updated to use our updated model. So instead of having an array of Todos we just have a string of PredictedSalary.

let init(): Model * Cmd<Msg> =
    let model =
        { Input = ""
          PredictedSalary = "" }
    model, Cmd.none

Next, we update the update method. This takes in a message and will perform the work depending on what the message is. For the Todos app, if the message comes in as AddTodo it will then call the todosApi.addTodo method to add the todo to the in-memory storage. In our app, we will keep the SetInput message and add two more to match what we added in our Msg type from above. The PredictSalary message will convert the input from a string to a float32 and pass that into the predictionApi.getSalaryPrediction method. The PredictedSalary message will then update our current model with the new salary.

let update (msg: Msg) (model: Model): Model * Cmd<Msg> =
    match msg with
    | SetInput value ->
        { model with Input = value }, Cmd.none
    | PredictSalary ->
        let salary = float32 model.Input
        let cmd = Cmd.OfAsync.perform predictionApi.getSalaryPrediction salary PredictedSalary
        { model with Input = "" }, cmd
    | PredictedSalary newSalary ->
        { model with PredictedSalary = newSalary }, Cmd.none

The last thing to update here is in the containerBox method. This builds up the UI. You may have already noticed that there is no HTML in our solution anywhere. That's because Fable is using React behind the scenes and we are able to write the HTML in F#. We'll keep the majority of the UI so there's only a few items to update. The content is what's currently holding the list of todos in the current app. For our case, however, we want it to show the predicted salary so we'll remove the ordered list and replace it with the below div. This sets a label and, if the model.PredictedSalary is empty it doesn't display anything. But if it isn't empty it does a formatted string containg the predicted salary.

div [ ] [ label [ ] [ if not (System.String.IsNullOrWhiteSpace model.PredictedSalary) then sprintf "Predicted salary: %s" model.PredictedSalary |> str ]]

Next, we just need to update the placeholder in the text box to match what we would like the user to do.

Control.p [ Control.IsExpanded ] [
                Input.text [
                  Input.Value model.Input
                  Input.Placeholder "How many years of experience?"
                  Input.OnChange (fun x -> SetInput x.Value |> dispatch) ]
            ]

And with the button we just need to tell it to dispatch, or fire off a message, to the PredictSalary message.

Button.a [
   Button.Color IsPrimary
   Button.OnClick (fun _ -> dispatch PredictSalary)
]

With all of those updates we can now run the app again to see how it goes.


Being able to use F# for the client as well as the server is a great way for F# developers to not only build web applications without having to use JavaScript and any of their frameworks, but also so they can utilize their functional programming knowledge to reduce bugs in the code.

If I were building web apps for personal or freelance work, I'll definitely give the SAFE Stack a try. I believe my productivity and efficiency of building the web applications will be much better with it.

To learn more (there is a good bit to learn since we're not only using functional patterns in a web application, we are also using the model view update pattern for the UI) I highly recommend the Elmish documentation and Elmish book by Zaid Ajaj. I'll be referencing these a lot in the days to come.

Participate in the 2020 Virtual ML.NET Hackathon

If you wanted to learn machine learning then join us in the Virtual ML.NET Hackathon! Here you can create or join a project to have fun, learn ML.NET and machine learning, and help contribute to open source.

For anyone not familiar with ML.NET there will be a workshop presented on November 13th to go over the basics of ML.NET.

Schedule

The workshop will be on November 13th and will start at 10AM Pacific or 1PM Eastern.

The week to officialy start hacking on your ML.NET code is from November 13th to November 20th.

Submissions of your projects or contributions will be on November 18th. And the winners of the hackathon will be announced on the 20th.

Sign ups have already started and feel free to reference the official schedule.

How to Sign Up

To sign up for the workshop and/or the hackathon, fill out this form. The first 50 to sign up will get a free tshirt!

Creating or Joining a Project

To create a project simply create an issue in the GitHub repository. When signing up feel free to describe the project or contribution you want to submit. You have the option to specify if you want others to join your project as part of a team as well to specify if you would like a mentor to help you with your project.

If you see a project that's already listed as an issue and it specifies they would like others to join their team, simply comment on the issue indicating you would like to join.

Note that, for your project, if you are using a dataset, to make sure that it doesn't have any personal information in it.

Submissions

Final submissions are due November 18th. To submit, create a pull request in the repo in the Submissions folder. Submissions must include a README file indicating what was done for a solution to the project or what was contributed, any source code used for the project, and a 1 to 3 minute video showing or talking about your project or contribution.

Submissions do not have to be fully complete or to run to be counted.